|
|
|
Who's Online
There currently are 6030 guests and
2 members online. |
|
Categories
|
|
Information
|
|
Featured Product
|
|
|
 |
|
|
There are currently no product reviews.
 ;
I AM HIGHLY IMPRESSED BY THE EASE OF USE OF THIS DOWNLOAD SERVICE. INSTRUCTIONS ARE CLEAR AND SIMPLE TO FOLLOW....EVEN BY TECHNOPHOBES SUCH AS MYSELF. THE EMAILS POINT YOU IN THE RIGHT DIRECTION...ITS SO EASY PEASY. THE DOWNLOAD CHOICE OF USER MANUALS IS EXTENSIVE AND I COULD NOT FIND A CHEAPER OR MORE EFFICIENT SERVICE ON THE INTERNET. I COULD NOT HAVE MADE A BETTER CHOICE OF INFORMATION PROVIDER. SHOULD I EVER NEED ANOTHER USER MANUAL, THEN THIS IS THE FIRST CHOICE SITE. COULD NOT BE BETTER PLEASED!!!!!!!...MANY THANXES FROM JIM BURNS
;
I was impressed with the quality of service (frequent e-mails to let you know the status of your order), and the speed at which the download became available. The manual was a life saver and was not easy to track down. Thank you for such an excellent service.
;
the manual was just what i wanted it had all the revelent information required to operate the hifi .Iwould use any manual i downloaded for any item which needs a manual
;
Die gewünschte Bedienungsanleitung wurde vereinbarungsgemäß in deutsch bereitgestellt. Sie ist gut lesbar. Kein Kauderwelsch.
Danke für den Service.
;
GOOD SERVICE MANUAL GOT ALL THE INFO. THAT I NEEDED..
®
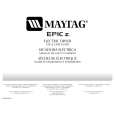
BV-60H/120H All-Tube Professional Series Guitar Amplifiers
4
Reverb
EFFECTS LOOP PAD 12dB ON EFFECTS LOOP
Channel 2
CH 2 CH 1 CHANNEL SELECT
Channel 1
PRESENCE
REVERB 2 REVERB 1
MASTER
LOW
MID
HIGH
GAIN
LOW
MID
HIGH
VOLUME
INPUT
3
5
6
7
8
9
10
11
12
13
14
15
16
17
18
The Front Panel:
1. POWER (not shown): This switch applies AC voltage to the amplifier, and should always be turned on first. The switch lights up when the AC power is on. 2. STANDBY (not shown): This switch activates the amplifier, and should always be turned on last. The switch lights up when the high voltage power is passing through to the tubes. NOTE: When you first power up this amplifier, leave the Standby switch OFF for at least 20 seconds. This gives the power tubes a chance to prepare themselves for action. 3. PRESENCE: Increase the level of upper harmonics with this control. The presence control allows a boost of up to 5dB at 10kHz. 4. EFFECTS LOOP PAD: This switch activates a 12dB pad on the effects send signal and corresponding gain recovery on the return. In the �out� position the signal is full strength which is best suited for line level rack mountable effects. With the switch �in� the signal is lower which is best suited for foot pedal type effects. 5. EFFECTS LOOP SWITCH: This switch controls the effects return signal of the effects loop. The loop is only active when the switch is pressed in. When a footswitch is used, this switch is disabled. The adjacent yellow LED glows when the loop is in use. 6,7. REVERB 2, REVERB 1: Adjust the amount of reverberation on each channel with these controls: at the "0" position the signal is "dry" (no reverb). As you bring the control up, the amount of reverb increases.
Channel 2:
8. MASTER: Set the output signal level of channel 2 with this control. At the "0" position (full left) very little or no signal will be heard; as you bring the control up (towards center) the output level of channel 2 increases. Use this control along with your guitar's volume and the channel 2 gain control (#12) to produce a wide variety of sounds. 9. LOW: Adjust the bottom end response with this control. The low control covers a range of 15dB at 100Hz. This sets the amount of heard (and felt) from the amp. 10. MID: Adjust the midrange response with this control. The mid control covers a range of 13dB at 500Hz. This controls the �voice� of your guitar. 11. HIGH: Adjust the high end response with this control. The high control covers a range of 10dB at 10kHz. This controls the �bite� of your guitar. 12. GAIN: Adjust the overdrive (distortion) level with this control. With the control towards �0� (to the left) the signal is relatively clean. As you bring the control towards �5� (center position) the distortion increases, along with the overall output level. Keep turning the control towards �10� and you�ll increase the distortion even more. 13. CHANNEL SELECT: Switch between channels with this push-button switch. The adjacent amber LED glows when channel 1 is selected (switch "out"), the red LED glows when channel 2 is selected (switch "in"). When a footswitch is used for channel switching, this switch is disabled.
Channel 1:
14. LOW: Adjust the bottom end response with this control. The low control covers a range of 16dB at 100Hz. This sets the amount of heard (and felt) from the amp. 15. MID: Adjust the midrange response with this control. The mid control covers a range of 20dB at 300Hz. This controls the �voice� of your guitar. 16. HIGH: Adjust the high end response with this control. The high control covers a range of 10dB at 10kHz. This controls the �bite� of your guitar. 17. VOLUME: Set the output volume level of channel 1 with this control. 18. INPUT: Connect your guitar or wireless receiver into this standard 1/4" jack using a shielded instrument cable.
4
|
|
|
> |
|